How to Use Serial Read in Arduino

Foreward
Hello everyone. Today I desire to write a brusque tutorial in response to a request that we received yesterday on the Meccanismo Complesso site by pensodisi.
I hope that volition exist useful both to him and to all others who have like needs.
Whatsoever asking or suggestion volition always be an incentive for us to amend.
Introduction
For those who delight in carrying out projects with Arduino, sooner or later they volition have to deal with the commutation of values between the Arduino and the PC to which it is connected.
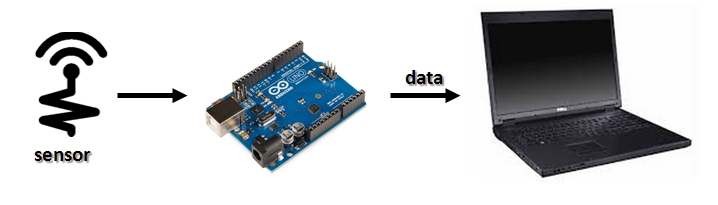
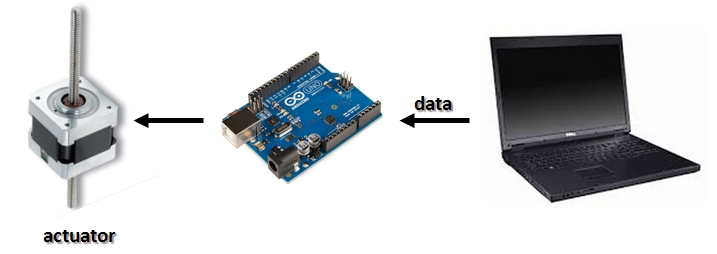
If yous utilize Arduino continued to a sensor (encounter Fig.1), Arduino produce a series of data that may exist sent to a calculator to be stored in a file, displayed or processed in some way. If you use the Arduino connected to an actuator (see Fig.2), such as a stepper motor, about likely, the computer will ship a series of information to the Arduino. The latter will process the received data by converting suitably into commands to send to the motor to get in move in the amount of necessary steps.
I'll discuss this topic in two different articles.
In this tutorial we volition come across an instance of the utilise of Arduino as a control for an actuator. To make this tutorial as elementary as possible, we volition use a servo motor as an actuator.

Instead, in an upcoming article, I will collect data from a sensor connected to the Arduino and sending these values to a PC.
Regarding the various commands to bulldoze the servo motor or other motor types (DC or stepper motors) I suggest you refer to the commodity Motor Command with Arduino and the Adafruit Motorshield v2 board.
Bulldoze a servo motor with a sequence of angles in a file
I chose a servo motor due to its simplicity, especially with regard to the controls. In this tutorial, the servo motor will presume the angles in a list within a TXT or CSV, moving sequentially in time, reading line past line.
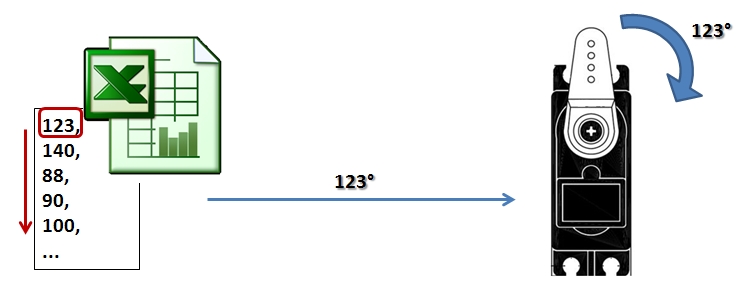
I chose this example, because despite its simplicity, it contains all the essential elements remaining simple and easy intuitibile. Information technology volition and so be easy to extend this example to more complex projects.
Allow'south take a look at the full general outline of what we will attain in this tutorial:
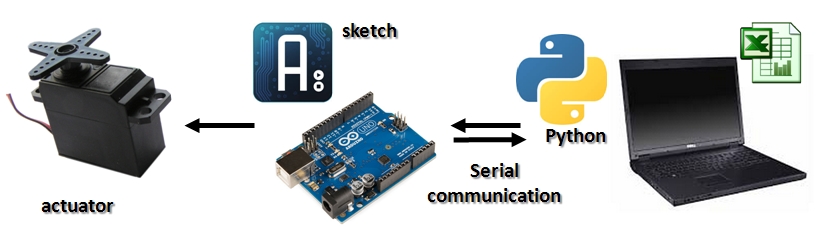
As you can see, y'all will activate a serial connection between the Arduino board and the PC. On the Arduino board you will implement a sketch that will take care of "to listen" for whatever value (bending) sent from the PC. From the PC side, instead, you will activate a serial session in a Python vanquish (merely information technology can be replaced by any plan in Python) that will read the contents of the file (CSV or TXT) past sending appropriate signals via serial to the Arduino.
I chose the servo motor equally an actuator also considering information technology tin exist connected directly to the Arduino without the use of appropriate control boards. Refer to Figure six for the connections.
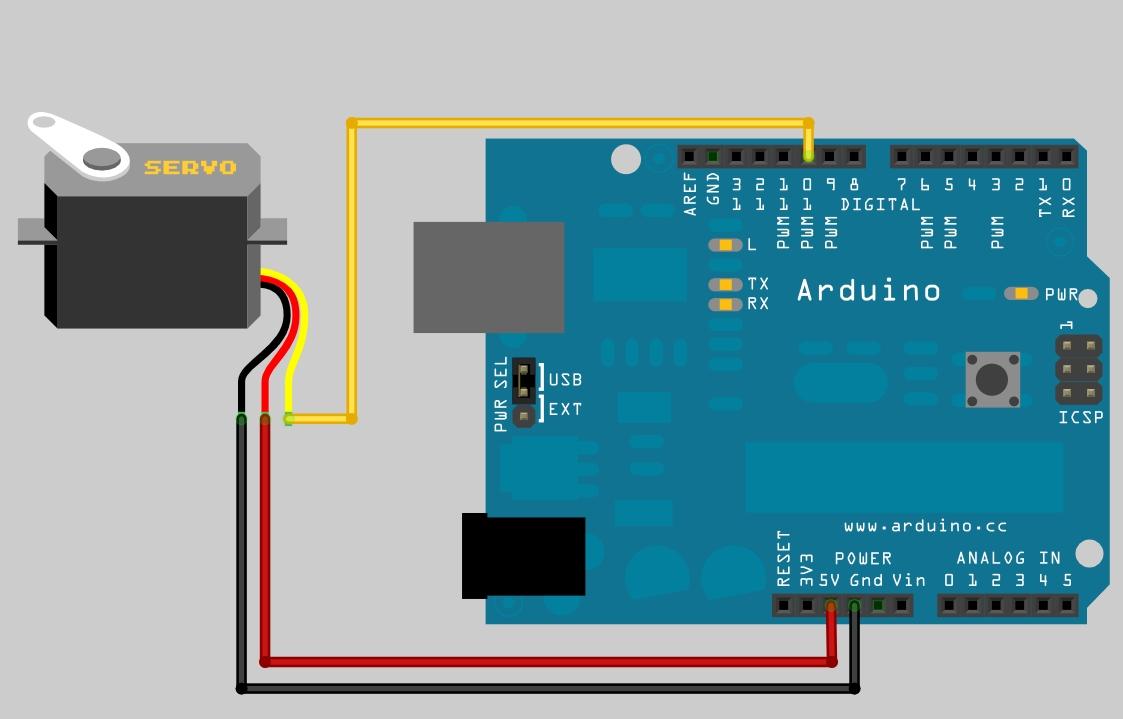
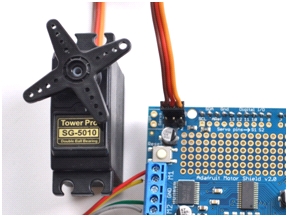
If you had the Motorshield v2 Arduino, you can refer to the following figure (Fig. 7).
The Arduino sketch
Start, let us develop the sketch with the Arduino IDE. (Click hither to go to the official page and download the latest release of the Arduino IDE).
First, you take to include the Servo library already included within dell'Arduino IDE
#include
This library provides us with a whole series of commands to manage Servo Motors in an like shooting fish in a barrel and intuitive way. This library is specialized for controlling this type of motors when they are direct continued to the Arduino. (If yous are interested, you tin consult the official page hither).
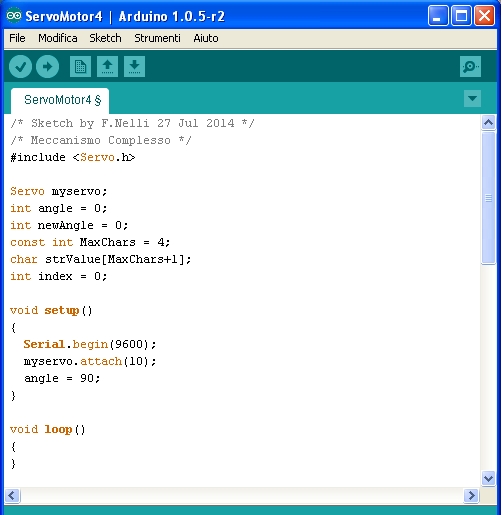
Servo myservo; int angle = 0; int newAngle = 0; const int MaxChars = iv; char strValue[MaxChars+1]; int index = 0;
Offset you define a myservo object, which corresponds to the servo motor. Ascertain as well the bending and newAngle variables that volition agree the values of the angles. And then yous volition define a strValues array of characters that will concur upwards to 4 characters (for case, '123,'). This array is used to store the values of the angles sent to the PC via serial port. Finally, an index that will help you lot later to browse the array of characters.
void setup() { Series.brainstorm(9600); myservo.adhere(10); angle = ninety; } void loop() {} Define now the two standard functions setup() and loop() .
The setup function practically takes care of initializing the board, and and so, commencement of all activate a series communication at 9600 baud. And then you have to define the servo motor to be continued to pin 10 through the function attach() of the Servo library. Finally, define a starting bending for the motor (Abode position) which in my example I divers as ninety°.
The function instead must contain all of the commands that will be executed from the board in a continuous cycle. I left empty this function, simply here you tin can implement everything you lot demand to fulfill your specific needs.
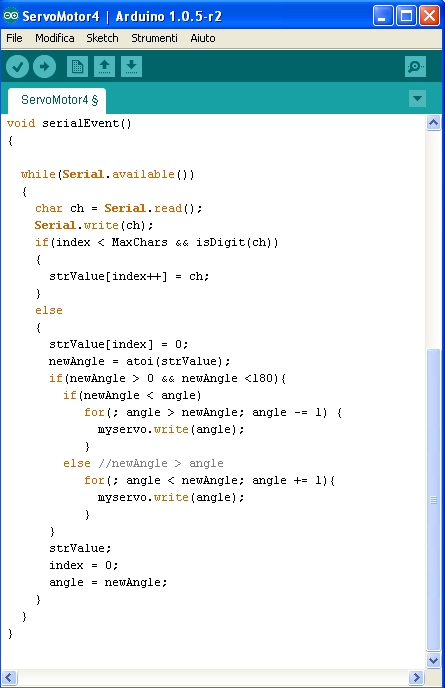
Finally, define a new function called serialEvent(). This feature, although it is not included within the loop(), is always listening, and when a serial upshot is captured past the Arduino board, as in our instance, the sending from the PC to a numeric value, the serialEvent role is activated, and the code inside is executed.
void serialEvent() { while(Serial.bachelor()) { char ch = Serial.read(); Serial.write(ch); if(alphabetize < MaxChars && isDigit(ch)) { strValue[index++] = ch; } else { strValue[index] = 0; newAngle = atoi(strValue); if(newAngle > 0 && newAngle < 180){ if(newAngle < angle) for(; bending > newAngle; angle -= 1) { myservo.write(angle); } else for(; bending < newAngle; angle += one){ myservo.write(bending); } } index = 0; bending = newAngle; } } } Each value sent from the PC is read character by graphic symbol and inserted into the strValue array. If the character read volition be a number (0 to 9) and then it is stored in the array, if it will be a not-numeric character (in this case the comma ',') the reading will be stopped and the value inside the array is converted to a numeric value through the atoi() function.
The numerical value so obtained is stored in the newAngle variable, and represents a new angle at which information technology must set the servo motor. This value to be acceptable must be between 0 and 180 degrees. This will so exist compared with the current angle bending , and depending on whether major or minor, nosotros will increase or subtract gradually (degree past degree) the bending of the servo motor. This is to avoid sudden jumps by the servo motor. The bending at which the engine must be set is defined by the write() function of the Servo library.
If you at present execute the code, you will see the servo motor rotating to the corresponding position angle of xc°. And then it will wait motionless listening to the values sent from the PC. Earlier moving to Python, you can do some tests. Activate the Series Monitor inside the Arduino IDE, clicking on the menu item Tools> Serial Monitor.
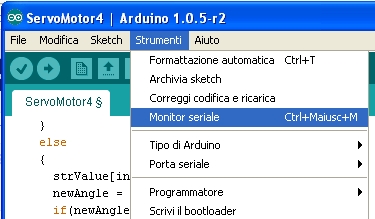
A new window will appear to us, the Monitor Serial precisely and with it y'all will exist able to experiment by writing directly the angles y'all want the servo motor to be moved. Write, for example, '123; 'and press ENTER.
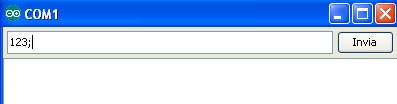
If you take correctly written the sketch and making all the connections, yous'll rotate the servo motor from the HOME position (90°) to 123°.

Commands from Python
At present you volition wait the Python part regarding the PC side.
Outset, outset a Python Shell. If you take non already installed on your PC become here.
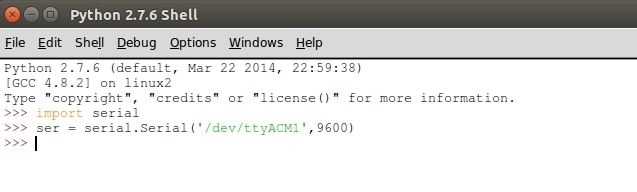
Once y'all open the shell import the serial library, and create a serial connectedness with ser listening to the Arduino lath at 9600 bauds.
import series ser = serial.Series('/dev/ttyACM1',9600) Beware the USB port in listening may vary, and then check from the Arduino IDE the active port (eg. COM on Windows tin be a ane,2,3 or 4). Then replace the serial port within the role Serial () .
Now if you lot write:
ser.write('110,') you will go a result identical to that obtained previously with the Serial Monitor. The servo motor will rotate until it assumed the position respective angle of 110 °.
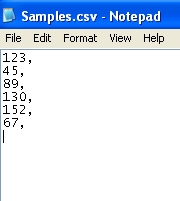
But the purpose of this tutorial is to read a sequence of values listed in a CSV file. Create a CSV file with a sequence of angles and save it every bit samples.csv .
Copy the file y'all but created in the working directory of the Python Beat out. If yous do not call up or practice not know what it is, enter the post-obit commands:
import os os.getcwd()
Vi apparirà la directory pigeon la shell di Python va a leggere direttamente. Copiato il file, scriviamo
import time file = open up('samples.csv') while 1: line = file.readline() if not line: break ser.write(line) time.sleep(iii) Every 3 seconds (divers by time.slumber () ) the Python Vanquish will read a line from the CSV file past sending the value, ie the angle, to the listening Arduino board, which in plough volition trigger the servo motor.
In one case the file is completed, close the reading of the file with the command.
file.close
Conclusions
As you can see the tutorial is basic, simple and easy to produce. it is a good starting betoken for any project that has among its functions the exchange of information.
Command lines of Python tin can exist implemented in a program, and for serial communication you apply a specific library, such as the pySerial library.
As regards the values I used angles, but yous could utilise any type of value, for example steps of a stepper motor, a distance, etc..
Furthermore, in the case of several motors, for example in automation CNC with two motors (XY) or three motors (XYZ) it is possible to pass a line with multiple values, for case the first value as the number of steps and the 2nd value as the motor to motion (X, Y, or Z). In short this tutorial should open up the mode to many projects. And if you will be inspired, nosotros would be proud of publishing your projects in this site.
[:]
Source: https://www.meccanismocomplesso.org/en/tutorial-sending-values-from-pc-to-arduino-by-serial-communication/
0 Response to "How to Use Serial Read in Arduino"
Post a Comment